
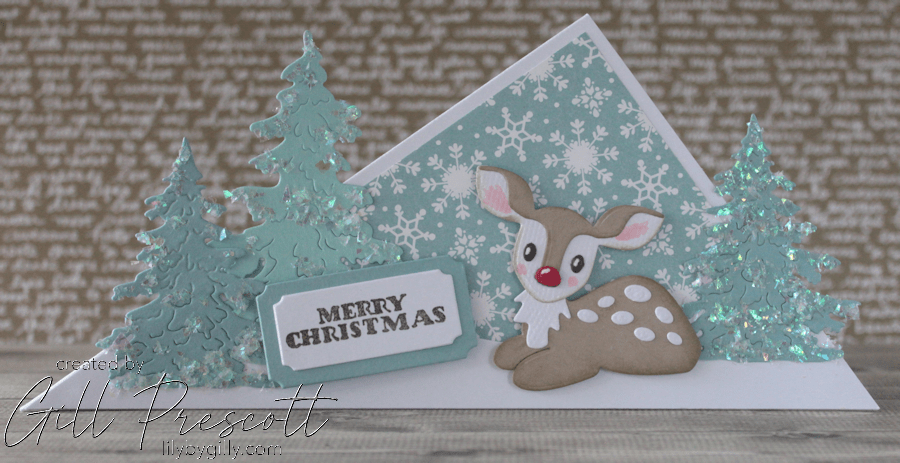
This week’s 52 Christmas Card Throwdown theme challenge was the perfect opportunity to step outside the usual card shapes and create something a little different! Inspired by cards seen on Pinterest, I designed a triangle-shaped card, featuring an adorable die-cut reindeer nestled in a snowy landscape. The combination of soft neutral tones, frosty blues, and shimmering snow accents makes this card feel wintry and magical.
Let’s take a closer look at how it was made!
Card Overview
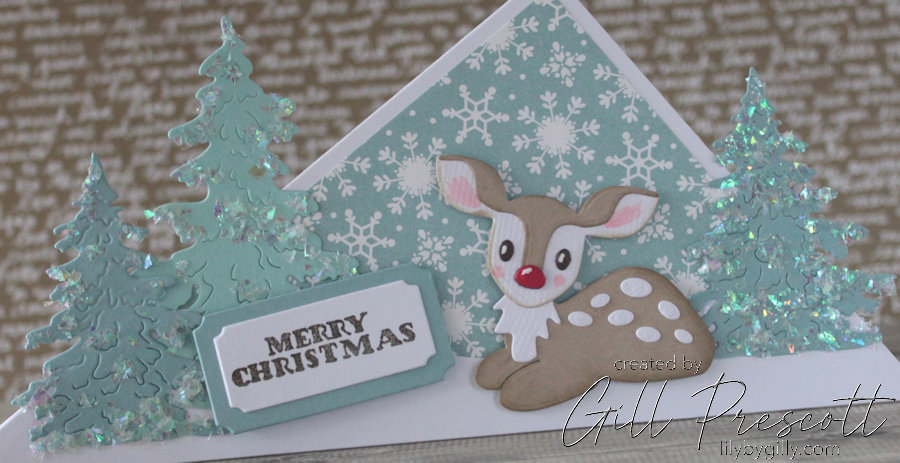
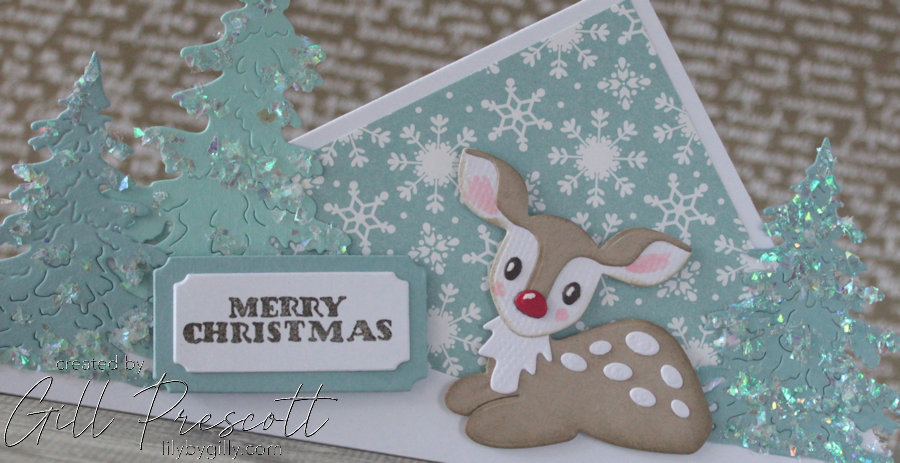
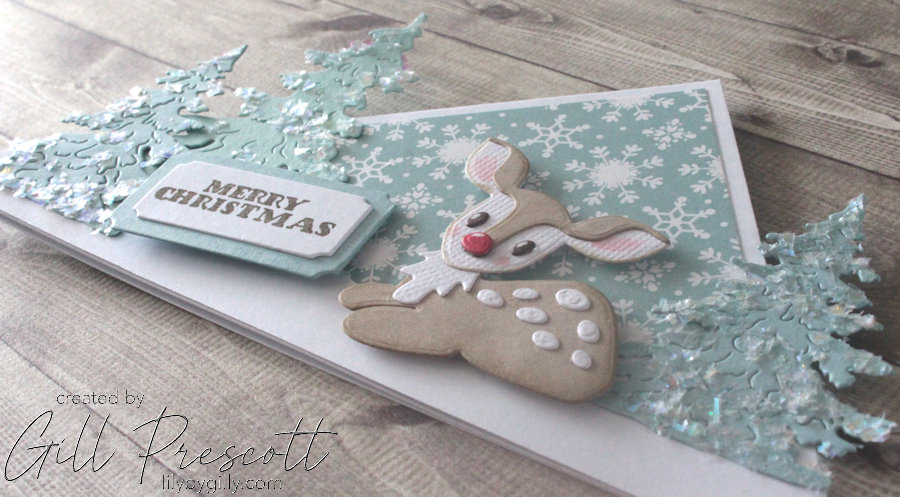
This design focuses on a sweet little reindeer, die-cut from the Eline’s Collectables range by Marianne Designs, set against a snowy backdrop. A triangle-shaped card base, the snowy hill, die-cut trees, and sparkling embellishments all work together to create a whimsical Christmas setting.
Materials Used
- Basic White Cardstock – for the triangle-shaped card base and snowy hill.
- Patterned Paper (DSP) – for the background layer.
- Crumb Cake, White, Real Red and Early Espresso Cardstock – for the reindeer die-cut.
- Crumb Cake Ink (Stampin’ Up!) – for shading the edges of the reindeer.
- Light Pink Marker – for adding blush detail to the ears and cheeks.
- White Gel Pen – for highlights on the eyes and nose.
- Die-Cut Trees – cut in two sizes using two shades of blue cardstock.
- Spellbinders Hand Made Holidays Stamp Set – for the greeting.
- Stampendous Make It Pop Up Dies – for the sentiment label.
- Blue Cardstock – to frame the sentiment.
- Frantage Encrusted Jewel Kit (Stampendous) – for snow-like embellishment.
- Dimensional Adhesive – to add depth to the sentiment.
Step 1: Creating the Triangle Card Base
The base card was cut from Basic White cardstock in a triangle shape by first cutting and scoring a standard A6 side-fold card, then using a paper trimmer, a diagonal cut was made from corner to corner. This unique shape instantly gave the card a fun and festive feel. To add contrast and pattern, I cut a slightly smaller triangle from DSP with a blue background and snowflake design and adhered it to the base, leaving a narrow white border around the edges.
Step 2: Adding the Snowy Hill
To ground the design and add dimension, I hand-cut a snowy hill shape from white cardstock and adhered it to the bottom of the card. This provided a base for the reindeer and trees while enhancing the wintery theme.
Step 3: Die-Cutting & Assembling the Reindeer
The adorable reindeer was created using the Eline’s Collectables die set by Marianne Designs.
- Crumb Cake cardstock for the main body.
- White cardstock for the muzzle, inner ears and breast.
- Early Espresso and Real Red cardstock for the eyes and nose.
To add depth and detail:
- The edges were lightly sponged with Crumb Cake ink, creating a soft, dimensional look.
- A light pink marker was used to add a rosy touch to the ears and cheeks.
- White gel pen highlights were added to the eyes and nose, bringing the little character to life.
The reindeer was adhered with foam tape, making it the star of the scene.
Step 4: Die-Cutting the Trees
To complement the background DSP, trees in two different sizes in two shades of blue cardstock were die-cut. The variation in size and colour added depth and interest to the wintery backdrop. These were positioned to the sides and behind the reindeer, creating a layered woodland effect.
Step 5: Stamping & Die-Cutting the Sentiment
For the sentiment, I used a greeting from the Hand Made Holidays stamp set by Spellbinders, stamped in Early Espresso ink on white cardstock.
To give the sentiment a polished, layered look:
- I die-cut it using a label die from the Stampendous Make It Pop Up Dies set.
- A slightly larger version was cut from blue cardstock to frame the sentiment.
- The two layers were stacked and popped up on dimensional adhesive to make the sentiment stand out.
Step 6: Adding Sparkle with Frantage Embellishments
For a frosty, snow-dusted effect, I added dots of glue to the die-cut trees and sprinkled them with shaved ice fragments from the Frantage Encrusted Jewel Kit. This subtle shimmer beautifully captured the look of glistening snow.
The result? A fun and unique triangle-shaped Christmas card, with a playful woodland theme and a touch of sparkle with a little pop of colour for Rudolph’s nose.

Customising the Design
If you’d like to put your own spin on this design, consider:
- Using a traditional colour palette – swap the blues for classic greens and reds.
- Adding a different focal point – a Santa, snowman, or winter cabin could work beautifully.
- Enhancing the sparkle – use silver embossing or glitter for extra festive shine.
Final Thoughts
This triangle-shaped Christmas card was a joy to create, and it was the perfect fit for this week’s 52 Christmas Card Throwdown Theme Challenge. The combination of a fun card shape, a sweet reindeer focal point, soft colours, and delicate shimmer makes this design feel extra special. The finished card is 7″ x 5 1/2″ but will fit comfortably into a standard 6″ square envelope, or you could make a custom envelope to fit.
Will you be taking part in this week’s challenge? I’d love to see how you interpret the theme—feel free to share your creations!
Happy crafting!

That’s such a lovely scene – the triangle shape is brilliant!
Wow, isn’t that just the most magical scene!
Something about being triangular just works, everything eminates from the point, like a North Star or a mountain peak, cascading star like snowflakes…love it.
wow Gill, mais elle est trop belle et original, biz