

It’s technique challenge week at 52 Christmas Card Throwdown, and this time we’re making Pinwheel Tower Cards! I thought I’d have a little fun with the format and put my own spin on it—literally! Instead of sticking with traditional straight-edged panels, I decided to use arch dies for the panels, giving the top of the tower a lovely rounded shape.
Let me show you how it all came together…
Card Overview
- Technique: Pinwheel Tower Card
- Base Colour: Night of Navy
- Panels: Arch-shaped with snowy scene details
- Focal Images: Snowmen and die-cut trees
- Colours: Night of Navy, White, Granny Apple Green, Red, Green and Blue accents
Materials Used
- Night of Navy cardstock by Stampin’ Up – for the panels
- Designer Series Paper (DSP) from my stash – for the centre tower
- White cardstock – for snow drifts and focal images
- Arch dies by Mama Elephant – for shaping the panels
- Penguins Go Skating stamp set – for the tiny snowflakes
- White posca pen – for the snowflake dots
- Snowy Friends Stamp Set by Stampendous – for the snowmen focal images
- Various sentiment stamp sets by Spellbinders and Mama Elephant
- Versafine Clair black ink – for the snowmen and sentiments
- Versamark ink and white embossing powder – for embossing
- Alcohol markers – for colouring the snowmen
- Granny Apple Green cardstock by Stampin’ Up – for die-cut trees
- Dazzling diamonds glitter – for sparkle
- Adhesives – wet glue and glue pen
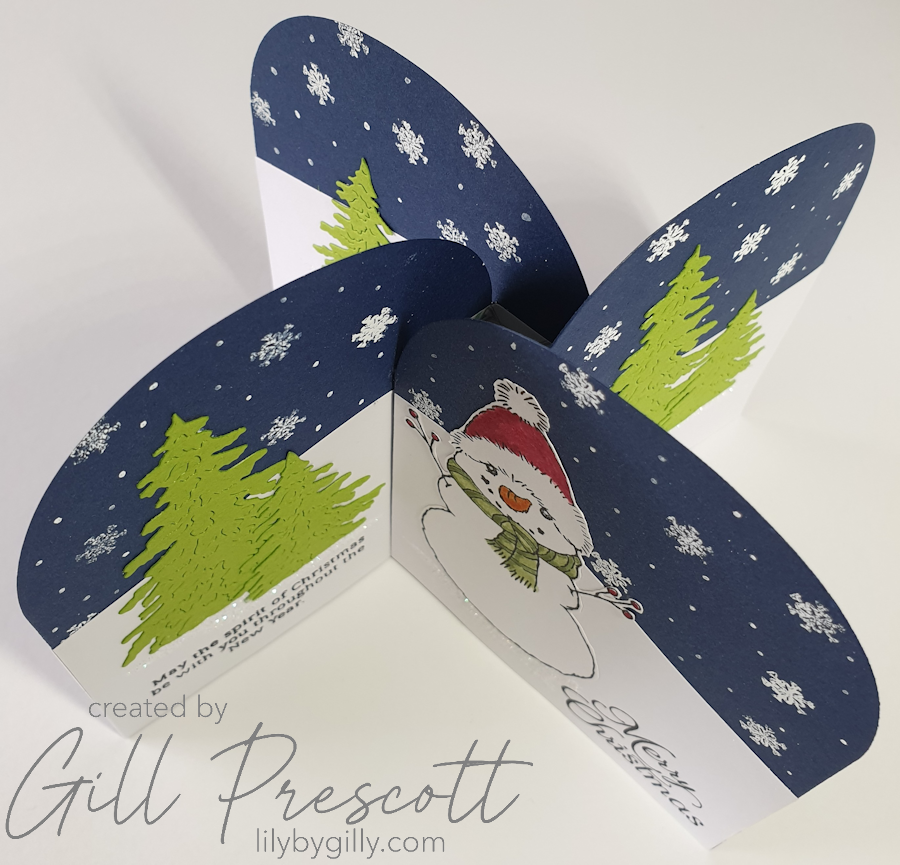
Step 1: Building the Pinwheel Tower Base
The base of the card follows the usual Pinwheel Tower fold technique, but I wanted the card to fold flat easily, so I chose a lightweight patterned paper (DSP) for the centre tower section. This keeps the bulk down and allows the card to fold flat for posting.
For the panels, I die cut four arch shapes from Night of Navy cardstock, giving the top edge that rounded arch look. This makes the card feel just a bit different and more special.

Step 2: Embossed Snowflake Background
To add some wintery texture, I stamped tiny snowflakes from the Penguins Go Skating stamp set all over each Night of Navy panel, using Versamark ink, then heat embossed them with white embossing powder.
The white embossing really pops against the dark blue background and gives a lovely snowy night effect. I then added lots of white dots using a posca pen.
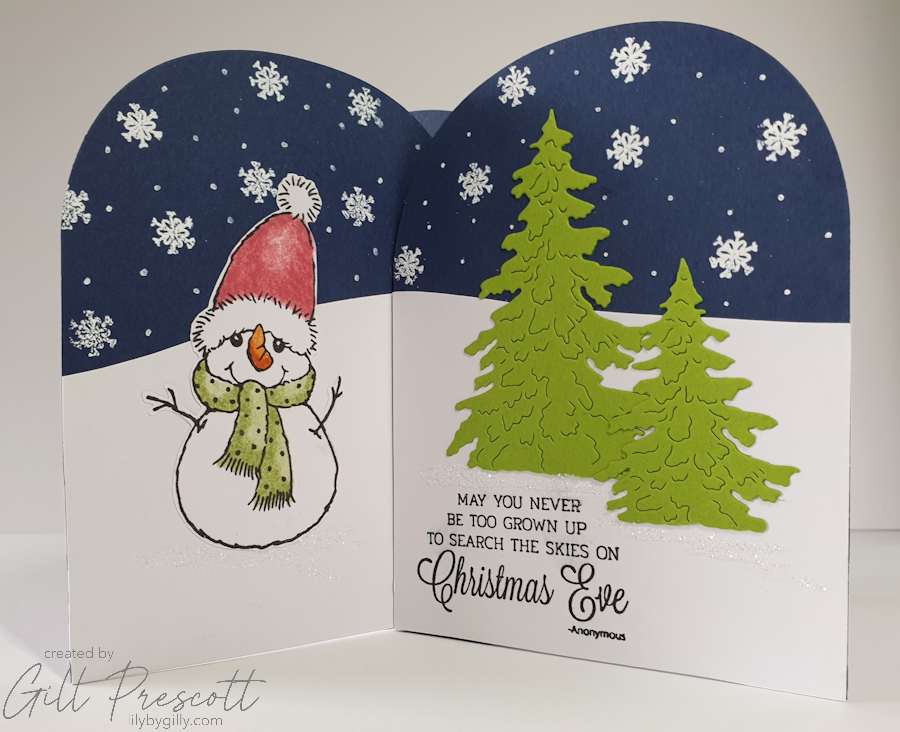
Step 3: Creating the Snowy Hills
I wanted to break up the navy background with some snowy foreground detail, so I cut a few curved snow drifts from white cardstock by hand. These were adhered to the bottom of each panel, giving the snowmen and trees somewhere to sit.

Step 4: Snowmen and Trees
For the main focal points, I stamped several snowmen onto white cardstock using black ink, then coloured them with alcohol markers in shades of green, red and blue to match a classic Christmas colour palette, and a little orange for the carrot noses of course! I absolutely love these little snowman images – they are so adorable and easy to colour and make my own.
Once coloured, I fussy cut them out and adhered them to different panels of the pinwheel tower using wet glue for a secure hold.
I also die cut several sizes of evergreen trees from Granny Apple Green cardstock, adding them behind and around the snowmen for depth and scene-building.
A different sentiment was stamped onto each of the panels.

Step 5: Assembly and Final Touches
Each decorated panel was adhered onto the arms of the tower base, making sure the snowmen and trees were positioned so they wouldn’t catch when the card folds flat. I added dazzling diamonds glitter below the snowmen and trees to ground them and add some sparkle.
The card stands beautifully when open and folds down flat to fit inside a standard A5 envelope—always a bonus when making fancy fold cards!

Final Thoughts
This was such a fun take on the Pinwheel Tower Card technique, and I love how the arched panels give it a softer, more whimsical look. The snowy embossing, bright trees, and cheerful snowmen all work together to make it a real standout Christmas card. This is my first time making this type of card, and I really enjoyed the challenge. There are lots of helpful YouTube videos out there to show how to make them, and I picked up lots of hints and tips on the way.
If you fancy giving this technique a go, why not join us over at 52 Christmas Card Throwdown this week? I’d love to see your creations!
Happy crafting! ❄️☃️🌲

I’ve never made one of these cards but I love your take on it with the arched panels
Thank you Deborah, that’s kind of you to say. This was a new card shape on me, so I had to research it a bit to find out how to make it. I like to push myself sometimes and had so much fun adding my own twist to the card. I hope you have a go too xx
oh la la Gill, comme toujours, tu relèves le défis avec charme et talent! biz