

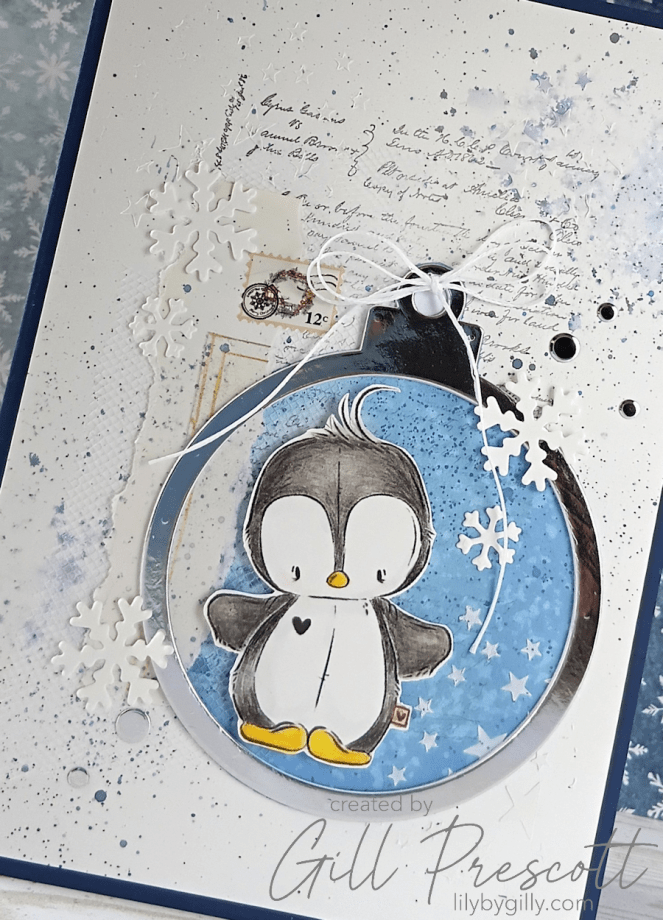
This week’s technique challenge at 52 Christmas Card Throwdown is all about mixed media – perfect for getting a little messy and layering up different textures and techniques. I decided to build my design around a bold bauble focal point with plenty of inky detail and texture.
Card Details
- Challenge theme: Mixed Media
- Card size: A5 (A4 scored and folded in half)
- Main colours: Night of Navy, shades of blue, white and silver
- Techniques: Stencilling, texture paste, ink blending, splattering, collage layers
Step 1: Preparing the Base
I started with an A4 sheet of Night of Navy cardstock, scored and folded in half to create my base card.
For the panel, I cut a piece of watercolour card slightly smaller – around 1/4 inch shorter on all sides – so it would leave a nice navy border once adhered.
Step 2: Building the Background
In the centre of the watercolour panel, I stamped a text stamp by Tim Holtz using Basic Grey ink, keeping it soft so it sat behind the layers.
Next, I created my own stencil by die cutting the largest bauble die from Craft Addiction UK out of sturdy plastic packaging. Using this homemade stencil, I blended two shades of blue Distress Oxide inks over the text area to create the bauble shape.
To bring in some texture, I spread texture paste through a star stencil in three random areas of the panel. Once this had dried, I added ink splatters using the darker blue oxide ink and a fan brush. A second round of splatters deepened the colour, and a light mist of water over parts of the splatters helped the ink blend and move naturally.

Step 3: Adding Collage Layers
On the left-hand side of the panel, I adhered a strip of white netting, then layered a piece of torn paper over the top – this both hid the glue from the netting and added another textured layer.
For a little vintage detail, I adhered a postage stamp sticker near the top of the torn paper.
Step 4: Framing the Bauble
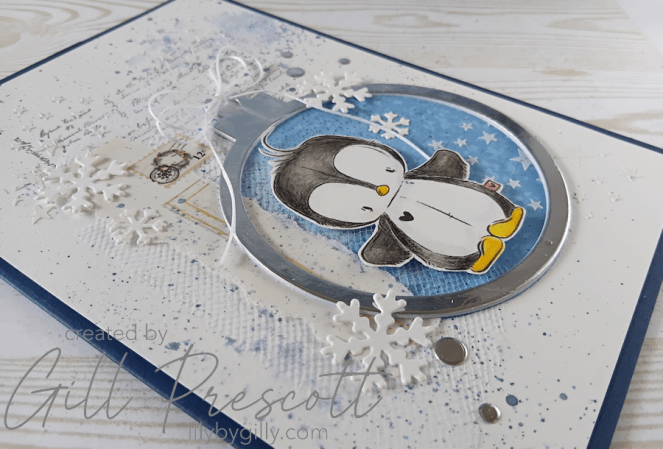
To give the inked bauble more definition, I created a bauble frame by die cutting three more baubles from white cardstock and one from silver mirri card. I stacked these together, with the silver on top, to form a dimensional frame, which I adhered over the stencilled bauble.
Step 5: Creating the Focal Point
For the centre of the bauble, I used a digi image of a penguin, coloured with watercolour pencils on watercolour paper. Once it was fussy cut, I adhered the penguin inside the bauble using foam adhesive, so it really stood out against the background.

Step 6: Embellishing
To finish the panel, I scattered die cut snowflakes in various sizes across the design, making sure the arrangement was pleasing to the eye. A few silver flat-back sequins were dotted around in uneven numbers to add a little sparkle.
Finally, I tied a double bow from white twine and adhered it with a glue dot to the top of the bauble, completing the festive focal point.
Final Thoughts
This card has so many lovely layers of texture – from the inky background to the netting, paper, foiled frame and sparkly details. It’s definitely a little more involved than my usual cards, but that’s the fun of a mixed media challenge!
Why not give it a go yourself? There’s still time to join in this week at 52 Christmas Card Throwdown.


What a sweet image and beautiful design!
And these colors, I love them so much!
Thanks for the inspiration, Majda
magical and cute in equal measure…P,p,p,p,p, perfect penguin
Zelo lepa voščilnica v mixed media tehniki!!!❤️
Very beautiful greeting card in mixed media technique!!
wow que c’est chou Gill, un amour…biz
Wow, that’s so cute Gill, a sweetheart…biz