
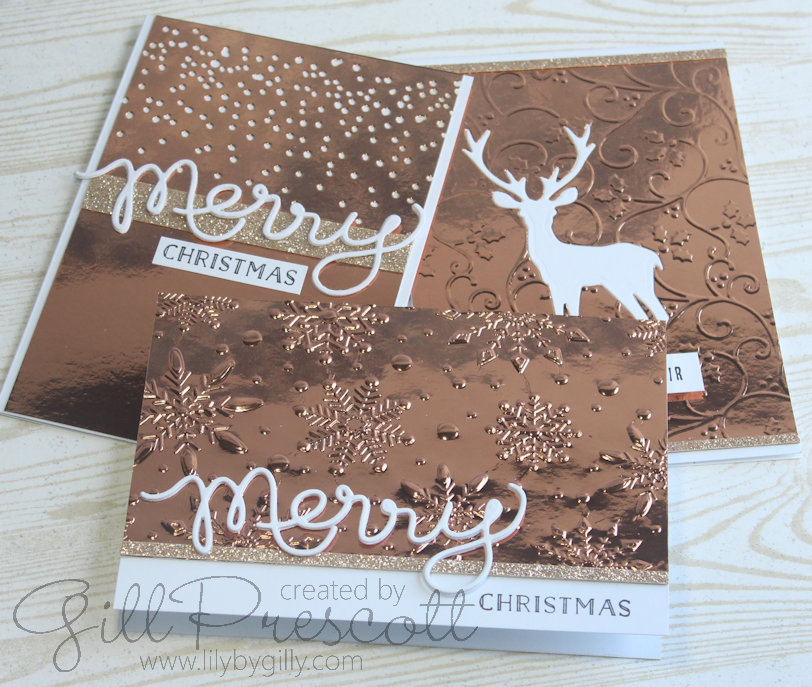
Creating stunning Christmas cards with a monochrome rose gold theme is a perfect way to combine elegance and creativity for the holiday season. This tutorial will guide you through making 3 sophisticated cards using some fantastic tools: the Spellbinders Flurry of Snowflakes Embossing Folder, Spellbinders Holly Flourish Embossing Folder, Tim Holtz Sizzix Winter Wonderland Thinlits Dies, and Stampin’ Up Expressions Thinlits Dies. Let’s dive into the step-by-step process to create cards that will wow your friends and family.
Supplies Needed:
- Cardstock: Rose gold foil cardstock, white cardstock, and a co-ordinating rose gold glitter cardstock.
- Embossing Folders: Spellbinders Flurry of Snowflakes and Holly Flourish.
- Dies: Tim Holtz Sizzix Winter Wonderland Thinlits Dies and Stampin’ Up Expressions Thinlits Dies.
- Adhesive: Double-sided tape or glue, foam adhesive for dimension.
- Die-Cutting Machine: Any machine compatible with your embossing folders and thinlits dies (e.g., Sizzix Big Shot, Spellbinders Platinum).
Step-by-Step Tutorial:
Card 1
Step 1: Emboss the Background
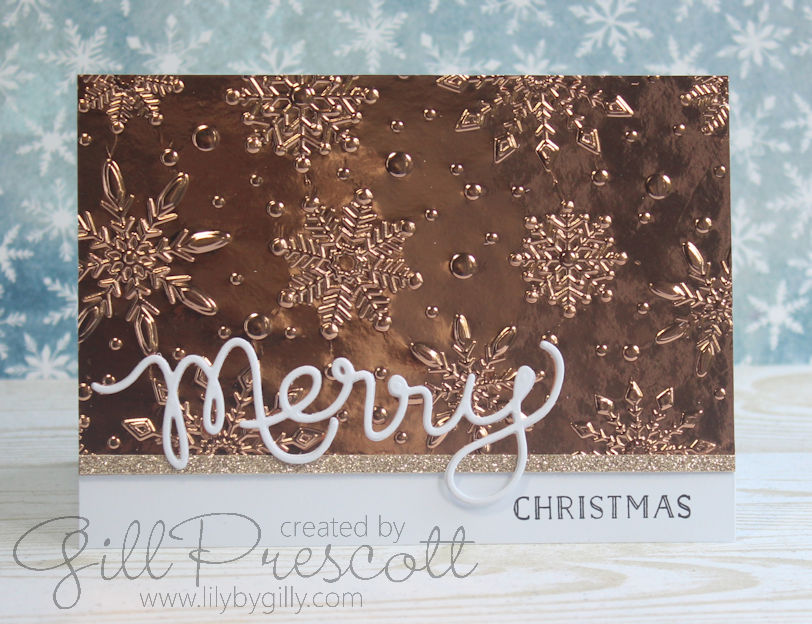
Start with a piece of rose gold foil cardstock cut to about 3/4″ narrower than your card base along the longest edge. Use the Spellbinders Flurry of Snowflakes Embossing Folder to create a textured background. This design adds an elegant, frosty touch that is perfect for a Christmas card. Run the cardstock through your die-cutting machine with the embossing folder to imprint the beautiful snowflake pattern.
Step 2: Create a die cut Sentiment
Use the ‘merry’ sentiment from the Stampin’ Up Expressions Thinlits Dies set to make 3 die-cuts from white cardstock and adhere them together using glue to add stability and dimension.
Step 3: Cut a strip of co-ordinating shimmer cardstock
Cut a narrow strip of co-ordinating shimmer cardstock, about 1/4″ wide. This touch of shimmer will tie the design together beautifully as well as tidying the cut edge of the foil embossed cardstock.
Step 4: Stamp a Sentiment
Stamp a small sentiment onto white cardstock and die-cut or hand cut to add below the die-cut sentiment.
Step 5: Assemble the Card
- Attach the embossed rose gold foil background to your card base using double-sided tape or glue.
- Add the strip of shimmer cardstock where the foiled piece meets the card base.
- Use strong glue to attach the die-cut sentiment to the card, giving the design depth.
- Finally, place the stamped sentiment at the bottom or center of the card, depending on your preference, using foam adhesive for a raised effect.
Step 6: Finishing Touches
Add small embellishments like sequins, pearls, or gems in rose gold or clear to add a touch of sparkle. If desired, lightly splatter the card with metallic rose gold ink for added texture and interest.
Card 2

Made a little differently to card 1, first die-cut the largest deer image from the Tim Holtz Sizzix Winter Wonderland Thinlits die set in the centre of a piece of rose gold foil cardstock, and also from white cardstock. Next, emboss the rose gold cardstock using the Spellbinders Holly Flourish Embossing Folder. The holly design will add a delicate layer of texture and contrast against the rose gold background. You could add a touch of dimension by lightly brushing the raised holly flourishes with rose gold ink or metallic wax for a subtle shine. Attach to a white card base and inlay the white die cut into the negative space of the original die cut, thus creating a flat, continuous design. Add strips of co-ordinating glimmer cardstock and a sentiment of your choice.
Card 3
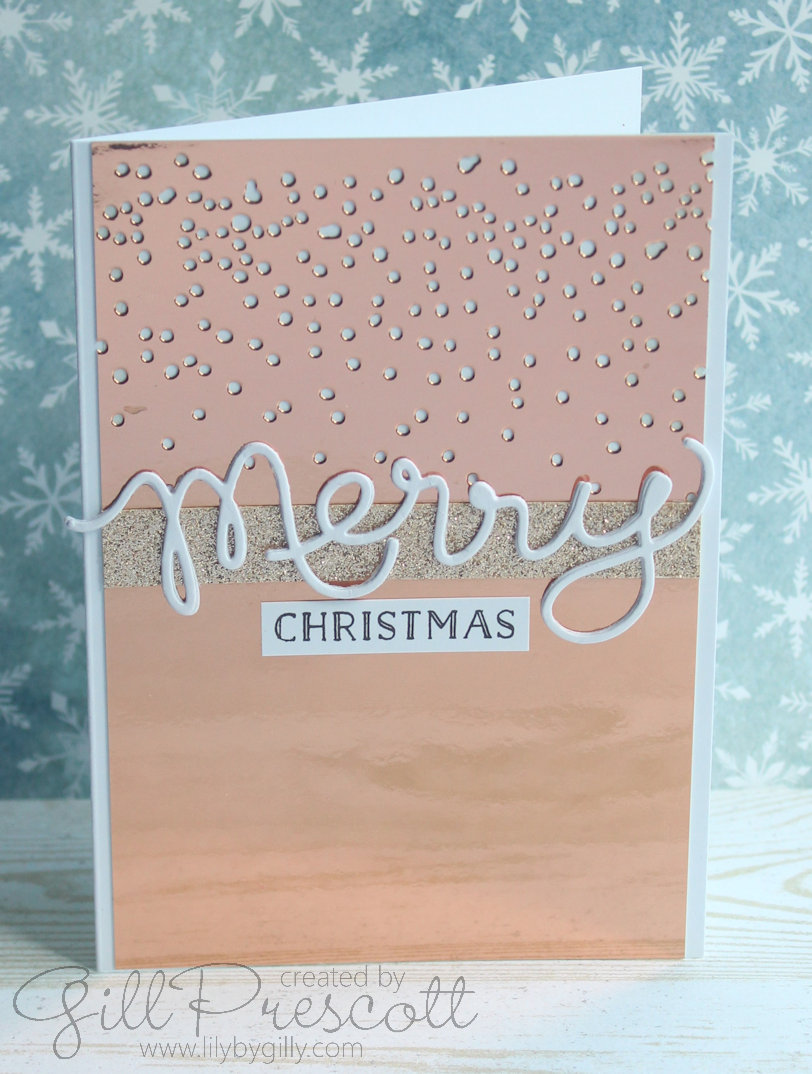
For this card, use the snow fall die from the Tim Holtz Sizzix Winter Wonderland Thinlits die set at the top of a piece of rose gold foil cardstock. Adhere this to a white card base, add a strip of 1/2″ glimmer cardstock and a sentiment. This card is simple, modern and elegant.
Final Thoughts
These monochrome rose gold Christmas cards are perfect for the season, combining elegance and a modern aesthetic with classic holiday elements. The use of embossing folders and intricate dies creates layers of texture and dimension that make the cards feel luxurious. Whether you’re sending to loved ones or using as part of your holiday decor, these cards are sure to impress.
I hope you enjoyed this tutorial and feel inspired to create your own holiday cards using these amazing products. Happy crafting, and may your holiday season be filled with creativity and joy!
Don’t forget to share your creations! Share your card at 52 Christmas Card Throwdown and tag me on social media with your festive cards—I’d love to see what you create!

wow Gill, quelle beauté! j’adore cette couleur or rose métallique, biz
Merci beaucoup Fabiola! Gill x
The rose gold is SO pretty on this – beautiful embossings with lovely white die cut sentiments and images!
Thank you for you lovely comments – I really appreciate them. Gill x
A trio of beautiful monochromatic rose gold Christmas cards. The EFs used look fabulous in this colour.
Thank you – that’s so kind of you to say. Gill x
So pretty!
Thank you Catherine – I’m so glad you like it. Gill x