

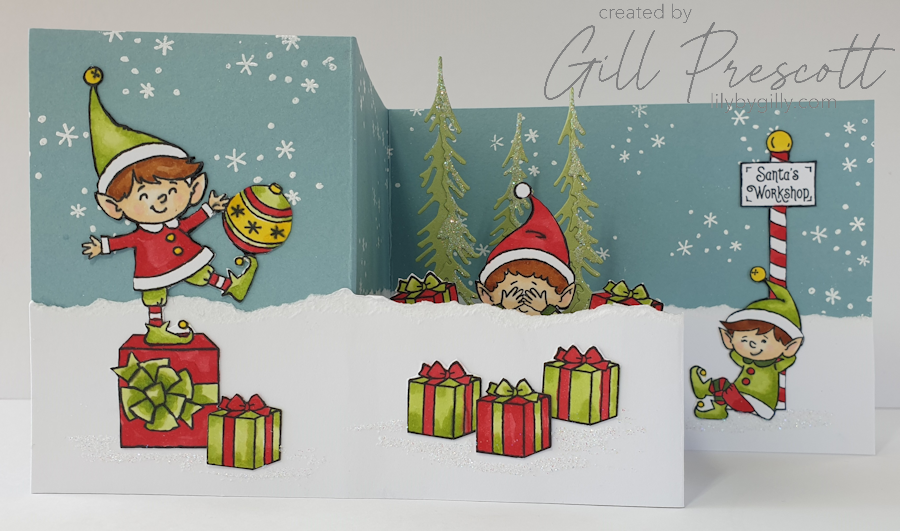
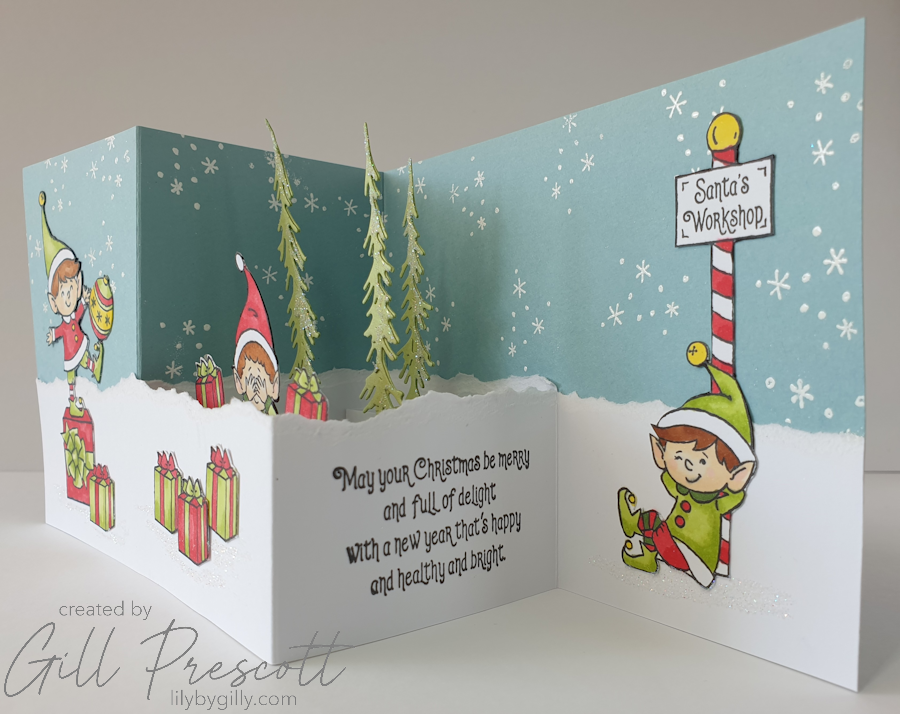
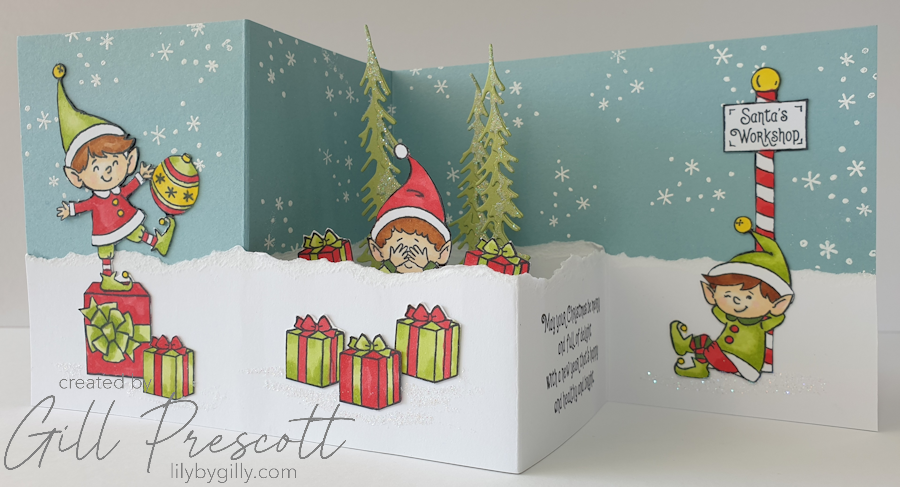
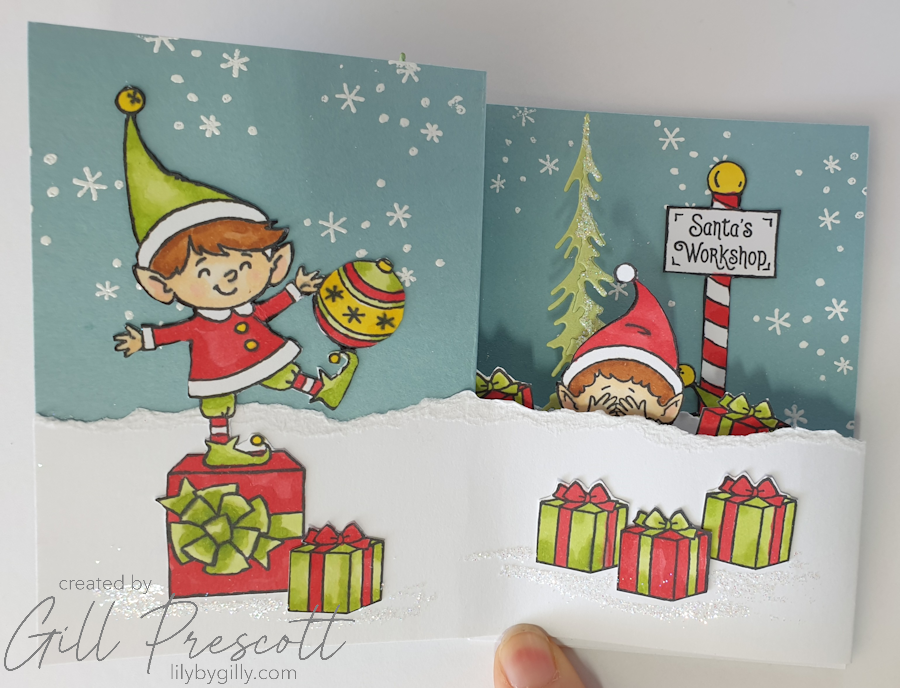
Hello and happy Saturday! This week at 52 Christmas Card Throwdown, we’ve got a delightful theme challenge: Santa’s Helper. I couldn’t resist diving into this playful prompt with a Z-fold card full of sparkle, cheeky elves, and festive colour. Here’s how I brought Santa’s little helpers to life.
Materials Used:
- Z-fold card base in Baja Breeze cardstock (Stampin’ Up)
- White cardstock for layering and pop-up elements
- Certainly celery cardstock for diecut trees
- Versamark ink
- White embossing powder (Ranger)
- Black ink for stamping
- Elfie stamp set (Stampin’ Up)
- Alcohol markers in reds, greens, yellow, brown and skin tones
- Tree dies
- Paper trimmer, adhesives
- Dazzling Diamonds glitter
Step-by-Step Instructions:
Step 1: Create the Z-Fold Base
Begin with a full sheet of Baja Breeze cardstock – I used A4. This cool blue shade gives a frosty, wintery vibe, perfect for an elf-themed card.
Cut the card in half lengthwise – you’ll be able to make two cards from one sheet of card.
Score in the middle and then again half-way between the first score and the edge of the card. Make a mountain and a valley fold and burnish on the score lines – this forms your Z-fold base.
Step 2: Emboss Snowflakes
Using the snowflakes image from the Elfie stamp set, stamp snowflakes across the top half of the card in a random pattern using Versamark ink. Heat emboss with white embossing powder by Ranger for a snowy, magical effect.
Step 3: Create the Bottom Panel
Cut a piece of white cardstock 2″ x the long side of a piece of A4. Score and fold to match the card base. Turn the card round so the score lines are opposite to the way the base card is folded, and tear along the top long edge for a snowy look. Stamp your sentiment in black ink on the centre section, as shown in the photo.
Cut another piece of white cardstock 2″ x long side of a piece of A6. Along the long edge, score in the centre. Fold and burnish. Tear along one edge to match the bottom panel. This will be adhered behind the pop up section, to continue the snow bank across the scene.
Step 4: Stamp and Colour the Elves
Stamp a selection of elf and present images from the Elfie stamp set onto white cardstock. Colour these in shades of traditional reds and greens, with pops of yellow for bells, buttons and accessories.
Once coloured, fussy cut each image ready for placement.
Step 5: Pop-Up Fun!
To create a pop-up centre, use strips of white cardstock to form bridge pieces inside the card. Attach 3, half an inch apart, slightly below the front section.
Step 6: Assemble the card
Take the torn strips and adhere these to the base card, lining up the bottom edges of the card.
Arrange the elf images on the card and adhere.
Adhere die cut trees, presents, and one of the fussy cut elves across the bridges of the pop up section for a dimensional, layered look. This card will still fold flat into a normal size envelope.
Step 7: Add the Sparkle
Apply glue just beneath the characters and embellishments, then sprinkle with Dazzling Diamonds glitter. This not only adds festive sparkle but also gives the illusion that everything is resting on a snowy ground rather than floating. Add glitter to the die cut trees if desired.
Final Thoughts
This Z-fold card was such fun to make — a mini winter scene filled with Santa’s cheery helpers, glitter, and whimsy. The interactive pop-up element brings the elves to life, and the embossing and sparkle tie it all together.
We’d love to see your take on the Santa’s Helper challenge at 52 Christmas Card Throwdown. Don’t forget to share your festive creations. Happy crafting!
I’m also playing along with the following challenges:
The Holly and Ivy Christmas Challenge – anything Christmas goes
Peace on Earth Christmas Challenge
Sparkles Monthly Challenges Blog – Fairy Tale or Storybook – inspired by one of my grandchildren’s favourite books – There’s an Elf in Your Book, by Tom Fletcher.
The 12 Months of Christmas Link Up – anything goes Christmas
Craft Challenge – cute – anything goes

isn’t that the most adorable scene. Love the different perspectives you get with this card.
That’s brilliant! Love those elves!
wow Gill, quelle superbe scène, ces lutins sont splendides, biz
Ich freue mich wirklich sehr über deine schöne Umsetzung des Themas. Für meine Karte habe ich eine Stanzschablone verwendet. Liebe Grüße
I’m really pleased with your beautiful interpretation of the theme. I used a die cut for my card. Best wishes.
ELFi
Absolutely adorably cute fun fold! Thanks so much for joining our challenge at Peace On Earth!
Diane POE CO-Owner
A gorgeous card with beautifully coloured images. I love it!
Thank you so much for entering our challenge at CRAFT Challenge, looking forward to see you again next challenge.
Hugs Sheryl xx CRAFT DT