
Hello friends! I hope you’re all having a wonderful week. Happy 4th July to those of you who celebrate today!
It’s time for another challenge over at 52 Christmas Card Throwdown, and this week we’re following a fabulous sketch by Deborah. I always enjoy sketch challenges because they provide a great starting point while still leaving plenty of room to add your own creative flair.
For today’s card, I decided to raid my stash and finally use something I’ve been saving for far too long! Many years ago, my lovely friend Sarah gifted me a collection of beautiful handmade Christmas card candy. It was almost too pretty to use, but I thought this week’s sketch was the perfect opportunity to let these sweet little embellishments shine. Thank you, Sarah, for your creativity and inspiration!
Let’s get started.
Materials Used:
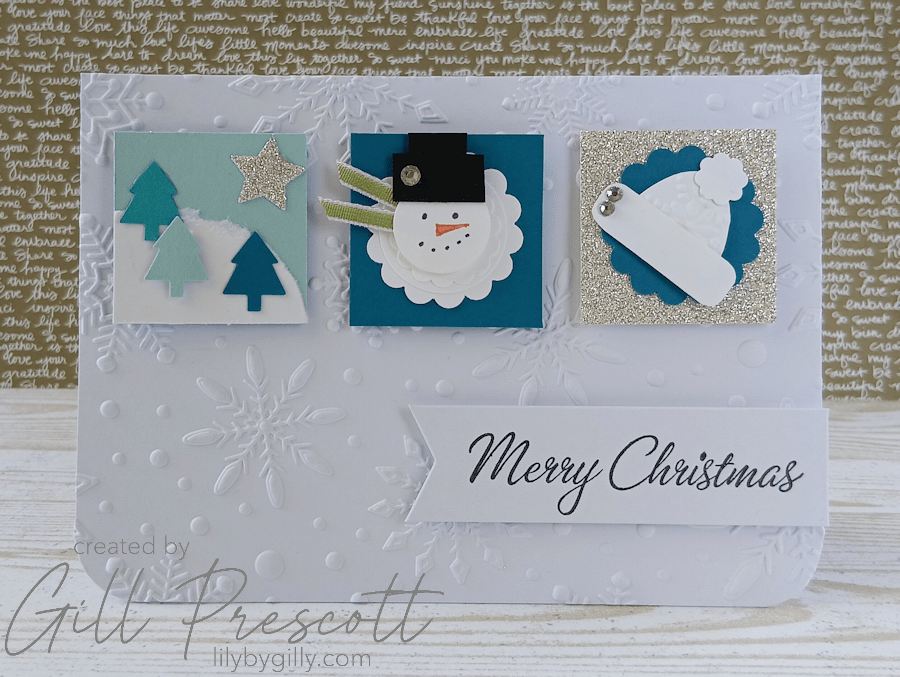
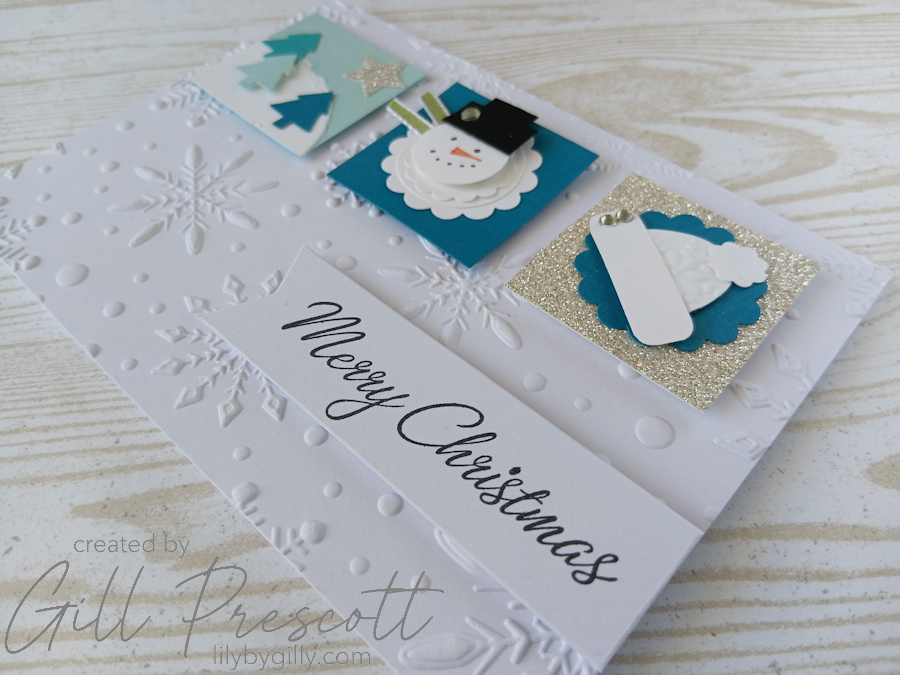
- White Cardstock: A6 card base (10.5 × 14.8 cm / approximately 4⅛” × 5⅞”). A6 is one of the most popular card sizes in the UK and Europe. The closest standard US size is an A2 card (4¼” × 5½”).
- Spellbinders Flurry of Snowflakes 3D Embossing Folder: For a beautifully textured winter background.
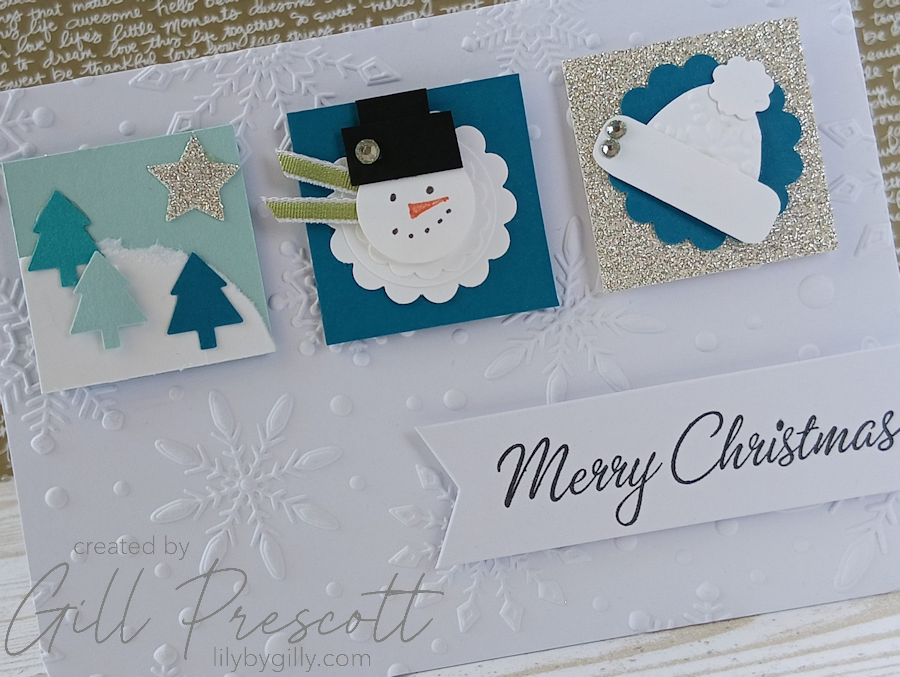
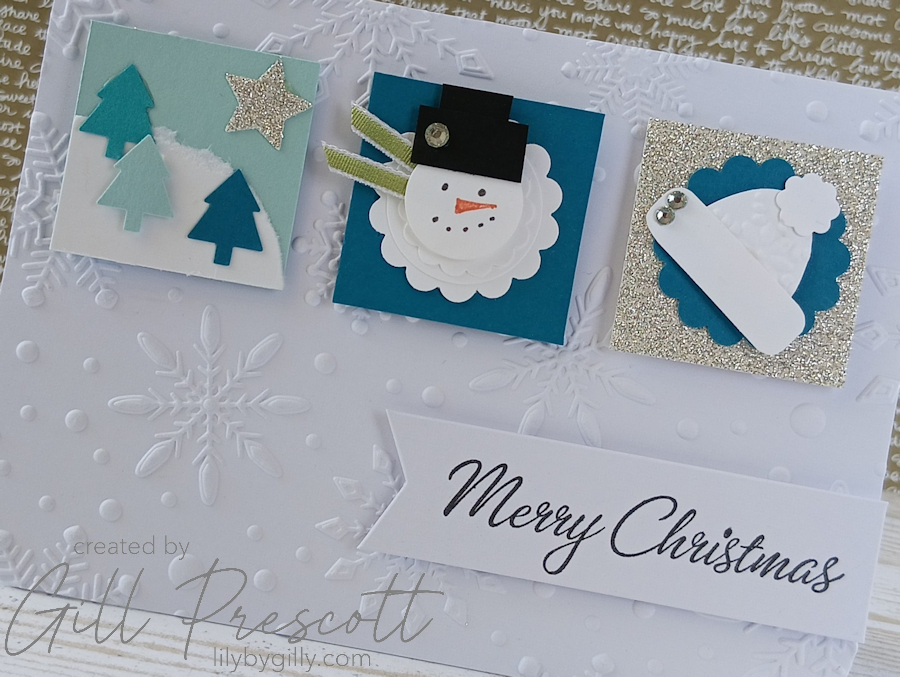
- Handmade Christmas Card Candy: Featuring:
- A snowy winter scene with layered punched trees in three shades of blue, finished with a glittery star.
- A charming punch art snowman complete with a narrow ribbon scarf.
- A cosy punch art woolly hat on a glittery background.
- Sentiment stamp
- Foam Adhesive
- Strong Liquid Glue
Step-by-Step Tutorial
1. Creating the Embossed Background
I began by creating an A6 white card base, one of the most popular card sizes here in the UK and across Europe. If you’re crafting in the US, the closest equivalent is an A2 card, measuring approximately 4¼” x 5½”.
To add lots of wintery texture without introducing another colour, I embossed the front of the card using the Sizzix Snowflake 3D Embossing Folder. One of my favourite things about 3D embossing folders is how much interest they add with very little effort. The snowflake design creates a lovely frosty backdrop while allowing the focal images to remain the stars of the show.
Tip: Lightly mist your cardstock with water before embossing to achieve an even deeper impression and help prevent any cracking.
2. Choosing the Focal Images
The sketch called for three focal elements, so I couldn’t think of a better opportunity to finally use the beautiful handmade card candy from Sarah. Each little piece is a work of art in its own right.
The first is a delightful winter landscape, complete with three punched trees in varying shades of blue, topped with a sparkling glitter star. The second is an adorable punch art snowman, finished with the sweetest narrow ribbon scarf. The third is a cosy winter woolly hat, layered over a glittery background that catches the light beautifully.
I love how each embellishment has its own personality, yet they work together perfectly as a festive collection.
3. Following the Sketch
With my background complete, I arranged the three focal pieces across the embossed card front, following the layout from this week’s sketch.
I moved them around a few times before settling on a balanced arrangement with plenty of white space around each image. Sometimes less really is more, especially when your embellishments are as detailed as these.
Once I was happy with the layout, I adhered each piece using foam adhesive, giving the card plenty of dimension and allowing the embossed snowflakes to peek through behind.
4. Flipping the Sketch & Adding the Sentiment
One little change I made was to flip the sketch from a vertical layout to a horizontal one. That’s one of the things I love about sketch challenges—you don’t have to follow them exactly! Rotating or flipping a sketch can give it a completely different look while still staying true to the original design.
For the sentiment, I kept things nice and simple by stamping a festive greeting in black ink onto a strip of white cardstock. I trimmed one end into a classic flag shape before using a ball tool to gently run around all the edges. This slightly compresses and smooths the cardstock fibres, giving the sentiment strip a lovely professional finish.
The completed sentiment was then mounted onto foam adhesive and positioned below the three focal images towards the right-hand side of the card, helping to balance the overall design without detracting from Sarah’s beautiful handmade embellishments.
5. Final Touches
The beauty of this card is that it really didn’t need much else – just the bottom 2 corners corner rounded to soften an otherwise square card. The embossed background provides all the texture, while Sarah’s gorgeous handmade embellishments bring colour, sparkle and lots of festive charm.
Sometimes it’s nice to let beautiful handmade elements speak for themselves.
Final Thoughts
This card was such a joy to make, not only because it came together so quickly, but because it reminded me how special handmade gifts from crafty friends really are.
I’m sure many of us have a little box of treasured embellishments, stamped images or die cuts that we’ve been saving for “just the right project”. My advice? Use them! They deserve to be admired on a finished card rather than hidden away in a drawer.
Thank you again, Sarah, for creating these gorgeous little works of art. It was lovely to finally give them the spotlight they deserve.
I hope this project inspires you to dust off some forgotten treasures from your own craft room and join us for this week’s 52 Christmas Card Throwdown Sketch Challenge. I’d love to see how you interpret the sketch!
Happy crafting, and enjoy your week!


Those little toppers are just fab! Perfect setting on the embossed background too! Great way to use my sketch xx
ho la la que c’est charmant Gill, ces mini dies sont si chou, biz